Thank You for Following My Blog

Saturday, 29 June 2013

My First Art Journal Page!


Art Journaling is something that I had been meaning to try for absolutley ages, however just never seemed to find the time!  I even had a lovley Dyan Reavely journal and srencils!  So after looking at them for quite a while I decided that I should finally put ink to paper and start playing!
Well, this is what I came up with.........
I used Dylusion inks and mica inks in pinks, yellows, oranges, pearl, gold and create the background.
I then used one of Dyan's A4 stencils and coloured through it with black distress marker which I then outlined with white gel pen.  The scene within the border was created with Dylusion stamps coloured with distress markers and mica paints. I highlighted the leaves with gel pen and created shadow around the images with charcoal and a blending stump.  I used the Dylusions alphabet stamps and Tim Holtz alpha stickers to make the quote.
I really enjoyed creating this page but haven't tried making another one yet.  So I think it is about time to get working on it!

Monday, 25 March 2013

Dina Wakely's Workshop


Last Friday I spent the day at Art from the Heart's studio taking part in Dina Wakely's workshop.  Which was about using paints, inks, wax and modelling paste on diferent surfaces such as plaster, cardboard, and plywood.  I had a great day and had so much messy fun!
Over the day we made 9 different peices (I forgot to put one in the photo...oops) due to the cool temperatures we had trouble getting the modelling paste on two of them to dry so we only finished 7 pieces. But that's an achievement in itself I think.
All the pieces were ply wood coated with plaster which we painted in different ways and then scratched and covered in wax to then scrap again to try and achieve different layers.  On one we added plaster bandage and when that was dry we painted and waxed it.  Another was two pieces of thick cardboard which we covered in plaster bandage and then once dry painted and waxed, which are to be turned into book covers.  One of my favorites was a board that we used modelling paste through a stencil then painted, scratched and waxed. However my all time favourite of the day was the board that we painted, then adhere stamped images on tissue paper with matt medium, then waxed and added more tissue images to build up layers.
It was such a great day and I can't wait to try these techniques all again soon.

Friday, 22 March 2013

And Party......

Here is another sample that I made using the balloon stamp HB101HF from Crafty Stamps Celebration range which can found at www.craftystamps.com.  Of all the stamps I made samples with this is the one I found the most versatile and the one I made the most samples with, which I'll share with you over the next few weeks.
This was such fun to make and so quick and easy.  I bought a pre-painted wooden shape, which in this case was the "&" symbol.  I then stamped the balloon stamp randomly over the shape with Jet Back Archival ink, then use a permanent black marker to doodle along the lines of the balloon strings to give extra definition and interest .  I then coloured the stamped images with Promarkers in colours of your choice, put Glossy Accents on the balloons and Stickles glitter glue for the highlights.  Once that has all dried I used a Promarker in a complimentary colour to colour the edges of the wooden shape.  Just keep in mind that it might take more than one coat of colour to cover it properly. Then using cut'n'dry foam to shade the edges of the shape to give shape and definition. 
Now once it has all dried that is you done!


Monday, 18 March 2013

Domestic Goddess - D.I.Y.

 Recently, I was asked to make some samples for Crafty Stamps http://www.craftystamps.com  to promote their new ranges of stamps that were released just in time for Stitches Trade Show at the NEC in Brimingham. I felt really honored to be asked to make samples for such a big event and really enjoyed using these stamps which are made of deeply etched red rubber and are high quality.
The stamp I used for for these cards cam from the "Domestic Goddess" range and is titled "DIY".
I thought she was really cute and I loved playing with this image.  I had so many different ideas but only had time to make two of them.
The top card was made on and 8"x8" scalloped card blank.  The image was stamped with Faded Jeans Distress Ink and the coloured using a waterbrush with the stamped image to shade it.  It was matted onto dark blue pearlescent card and layered onto white card, that had been coloured with Distress Stain splats which had been "dribbled down the page to intimate paint splashes and spills, which was then matted onto the same dark blue card as the stamped image.  The card was then embellished with screw brads and DIY themed embellishments.
The next card was made with a cream 6"x6" card blank. A piece of distressed and inked patterned paper.  The image was stamped in Vintage Photo Distress Ink and coloured with as before.  It was die cut with decadron Spellbinder die and layered with pearlescent brown card. The topper was layered with dimensional glue to the card centrally. It was then embellished with DIY themed stickers and adhesive paper ruler ribbon.
I hope you like these cards and if you are interested in buying the stamps they are available at Stampers Grove http://www.stampersgrove.co.uk  or the Crafty Stamps website http://www.craftystamps.com


Friday, 15 March 2013

Save the Date

As many of you now know I teach classes at a local craft shop in Edinburgh called Stampers Grove (you can have a look at their blog at the following address http://www.stampersgrove.co.uk/blog/) and this is a project I made for one of my recent classes.
It is a 2013 Diary with sections for notes, addresses and of course, as the name suggests a date book. It was made completely from scratch using, chipboard, pearlescent card stock, white card, patterned paper, stamps and embellishements. It was then bound using the Bind-it-all machine.
The covers were made by covering 2 peices of A5 chipboard with Bobunny patterned paper with was attached using Rangers Glue'n'seal.
The front was decorated with stamped swirls that were heat embossed with gold embossing powder.  Die-cut shapes made with Spellbinder dies were than layered in completementary card and the year in numbers adhered with dimensional glue.
It was decorated with paper flowers and leaves, cut out stamped and heat embossed images, butterflies, ribbon and pearls.  
 The divider pages were cut just slighlty smaller than the covers. they were edged with faux stitching and a strip of the same paper used on the covers. A spellbinders die was used to cut the plaque which was then stamped with the section title.  The same swirl stamp used on the cover as was used in the rest of the project, in order to tie it all together.
 I used a Dimesion Forth Stamp set to make the calender pages and then embellished these pages with the same Creative Expressions swirl stamp and a die cut using spellbinders dies with the appropriate month stamped on the plaque.
 I also included a section for notes in order to make this a multipurpose organiser rather than just a diary.
 The "note" pages were created from blank white cardstock with cobalt archival ink and stamps.  I used a lovely Stampin'Up alphabet set, the same swirl stamp that I have used throughout the project, as well as a Prima quote and Kanban set that I used the chain for a chandelier to create the lines.
 These two pages were created in the same way as previously explained. The entire book was then bound together using the Bind-it-all machine, which in itself was a learning expereience as I had never used it before.  But the directions included with the machine are very clear and I was happy with the final result.
 I hope you like it and are tempted to try making your own.

Monday, 11 March 2013

Remember......

 
  As some of you may know or may not know I teach craft classes at a small craft shop in Edinburgh. Since about half way through last year we have been running a series of classes focusing on "Re-use, Reduce, Recycle" and in this class we altered an old box that Emma had received some cardstock in to make this decorated  memo board.
I painted a pale base colour onto the box with acrylic paint to prime it.  Covered the edges with Tim Holtz tissue tape and inked it. I lined the inside of the box with Bo Bunny patterned paper that I inked and stamped with two-step Caludine Hellmuth stamps, jet black Archival Ink and gold Paper Arsty Fresco Finish paint. 
I cut two matts of co-ordianting colours and adhered them to the box and added a pad of post-it-notes to the matts.  The word was made of alpha chippies that I coloured with Tim Holtz alcohol inks and glued to the top of the matts at jaunty angles.
 I used the reverse side of the same paatterned paper to make the paper roses and punched some leaves.  Added some Ideology hitch fasteners for keyrings to hang on. 
 I then die cut and decorated a dress form mannequin, and some cotton reels.  I then added these to the edges of the box and embellished with buttons, ribbons, hat pins and adhesive gems.
It was such fun making this and we had a such a great time in the class too. 


Saturday, 9 March 2013

My Beautiful Princess


My gorgeous daughter turned 6 in January and this is the card I made her to celebrate.  She is currently right into her Disney Princesses among other things and at the time wore this tiara she got for Christmas almost constantly.  So it seemed only right that I use some of my princess themed scrapbooking stash to make this card, with a picture of my princess taking center stage!
I then used an inked doily, adhesive pearl swirls, some purple gems and a large glittery number "6" to embellish the card.
She was so excited about turning 6 and loved her princess card.

Friday, 8 March 2013

103!!

 
Recently, I had the amazing pleasure and privilege of being asked to make a colleague's at works grandfather a 103rd birthday card. I was soc huffed to be asked to make such a special card, and it was even more special as I made his 100th birthday card!  The only 100th and 103rd birthday cards I have ever made!
So, to make this card I used number templates and cut them out of Tim Holtz patterned paper.  I then adhered them to an A5 pearl bronze card blank.  I edged the numbers and card blank with gold peel offs and them very simply embellished the card with  ribbon, an adhesive black gem swirls, an Ideology inspirational plaque that was coloured with metallic Distress Stains, and vintage metal chasms, chain and brad.
The recipient has poor eyesight so I made everything large and bold so hopefully he could see it and enjoy it.
I wish him every happiness on this such a special birthday, and hope he likes his card!.


Monday, 4 March 2013

My Heart Belongs to...................

 
Recently, I decided that I have way to much stash and that I have ti definitely start using it rather than just gazing longingly at it and sometimes stroking it.....lol!
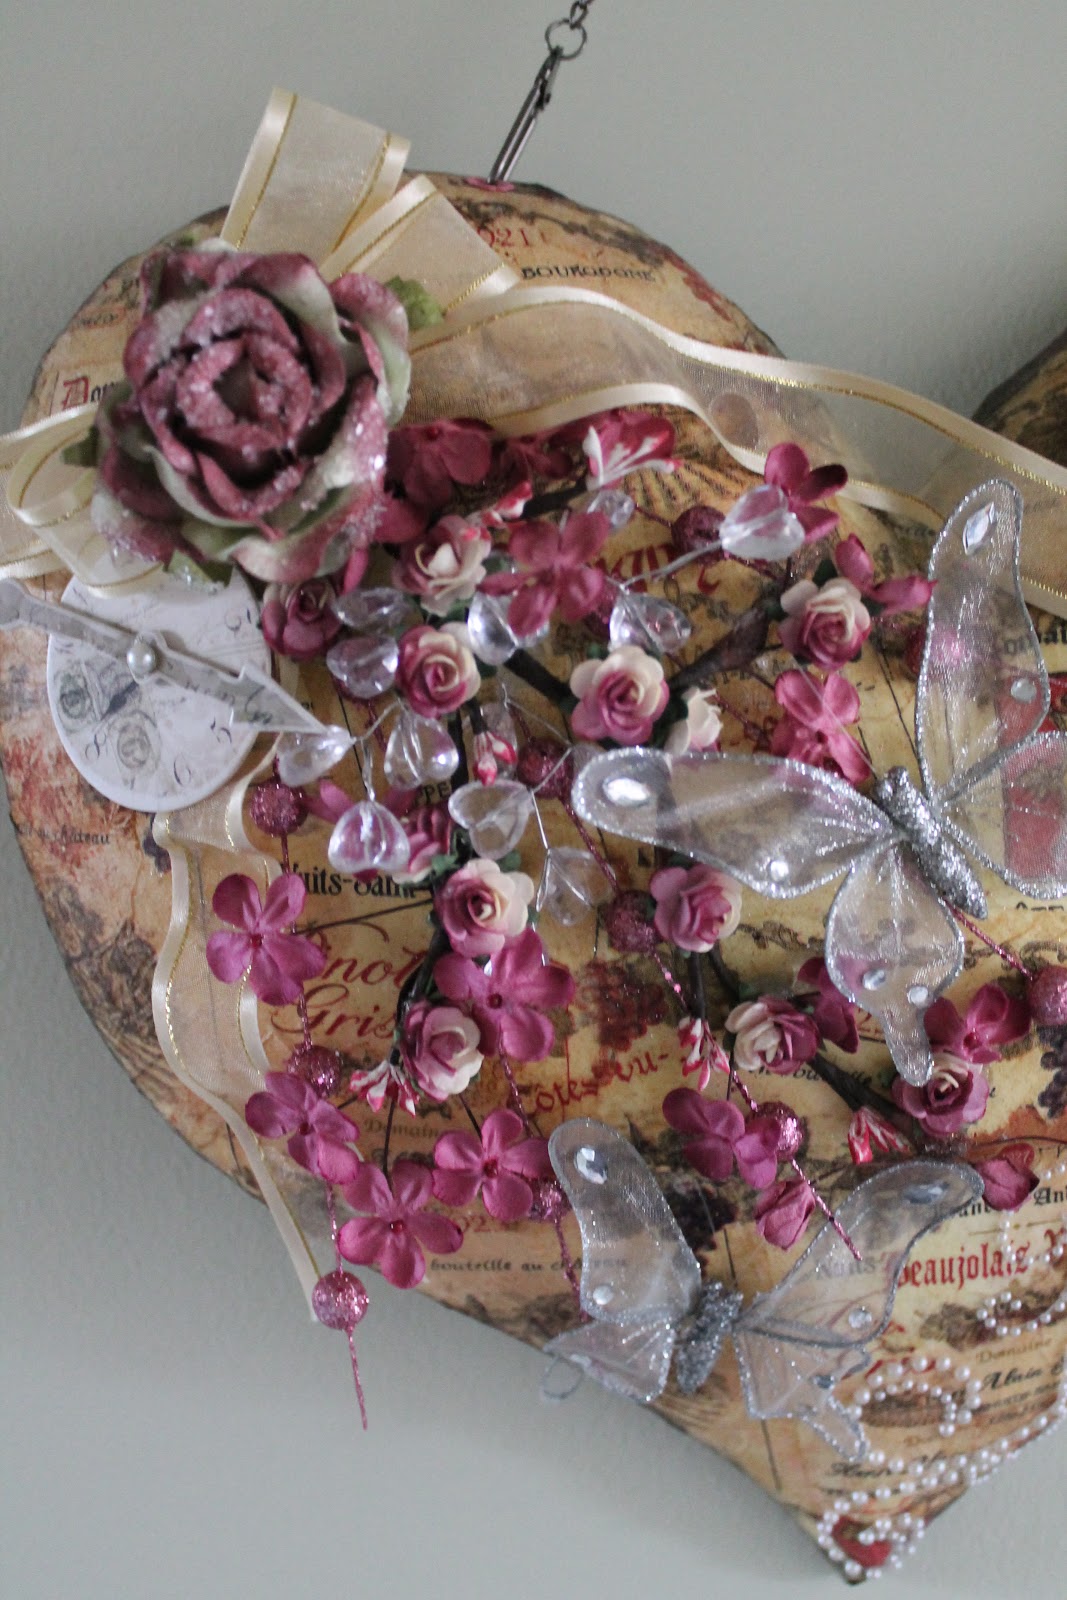
So, after I a little thought I picked a large papier mache heart to decorate with bit and pieces from my large amount of stash.  So I started by painting the heart with a cream acrylic paint and then covering with a printed napkin and matt glue'n'seal.  I then distressed the edges with Aged Mahogany, Vintage Photo and Walnut Stain Distress Ink.
Once that was all dry, I dove into my glorious stash and started pulling out anything that took my fancy.  It was then a matter of trying different things until I was happy with the look I managed to create.
So, I used a lot of paper flowers,along with crystal sprays and glitter ball sprays and layered them onto the heart and glued in place with glue gel.  Once the flowers were in place I embellished with butterflies, a clock and ribbon.
I also used an Ideology inspirational plaque and the word "Dream" that I found in my stash. More butterflies, an adhesive pearl swirl, some metal embellishments and a word plaque.
So I could hang it, I used a crop-a-dile and punched two holes and set co-ordinating eyelets and then used two swivel clasps, jump rings and some chain.
It was so much fun creating this and playing with my stash.  Sometimes it is so easy to just save your stash but in fact it is more fun to use it.  I'm off to use some more.....!


Friday, 1 March 2013

Happy Valentines Day (or at least it was.........lol!)

 
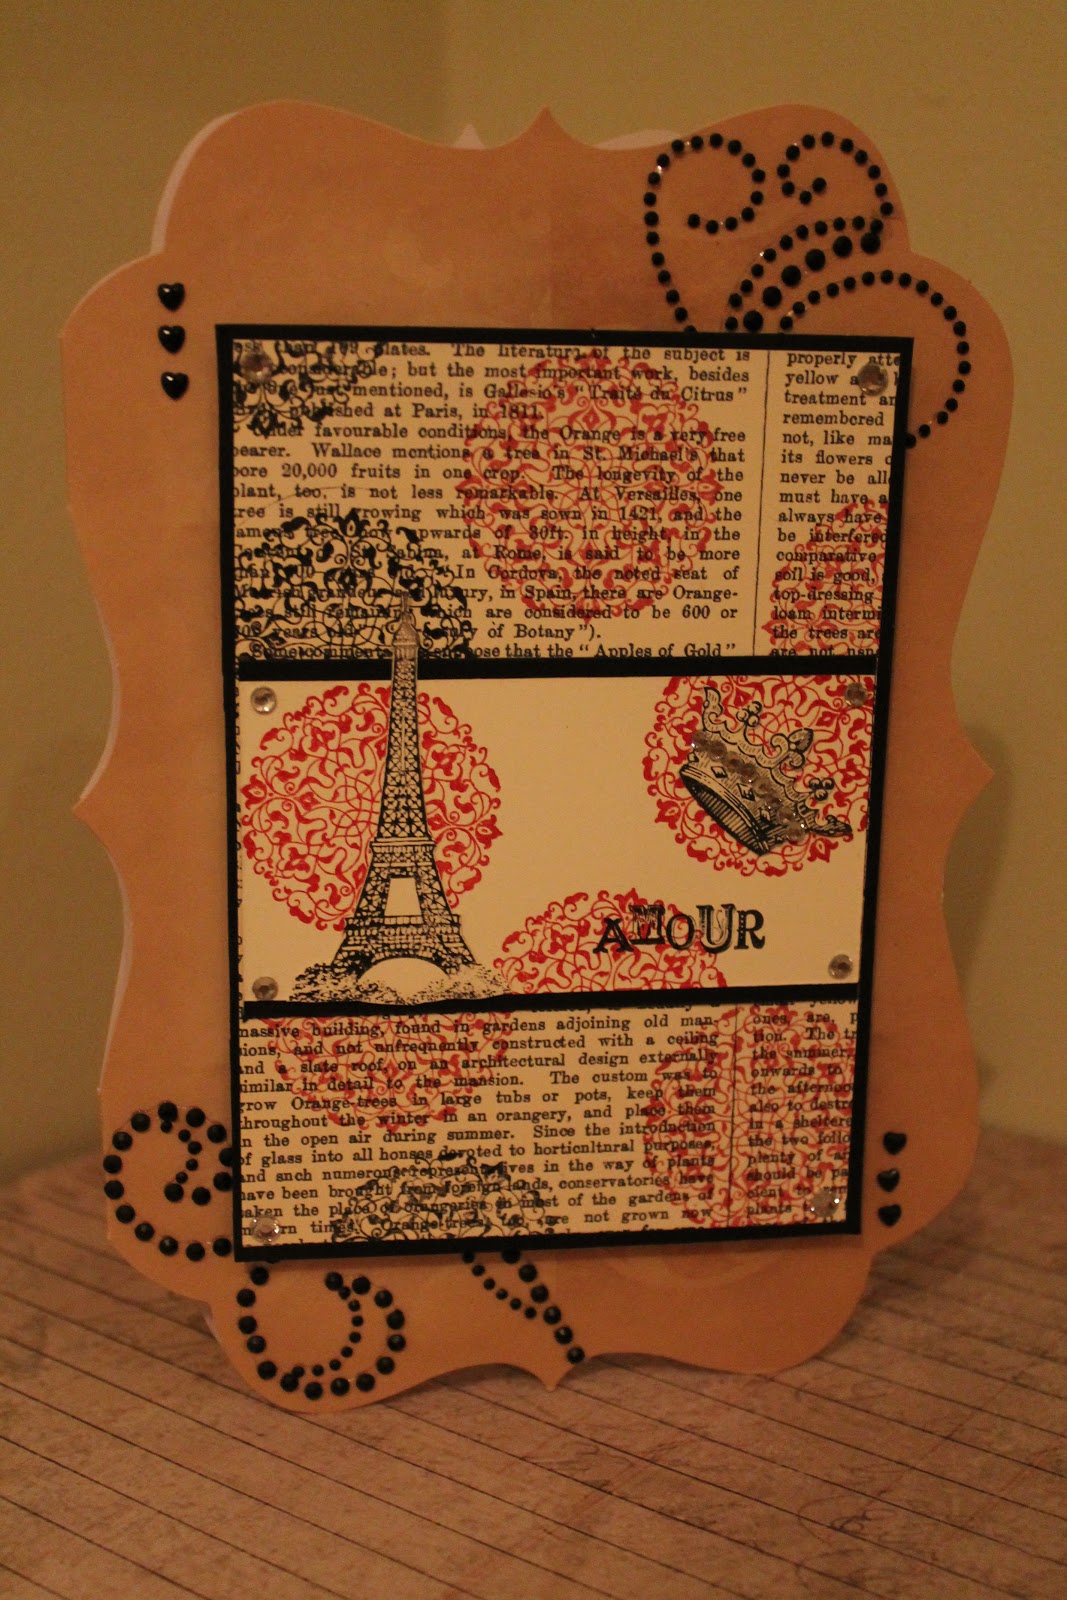
So, just in case anyone missed it........it was Valentine's day two weeks ago! And believe it or not, I managed to remember to make my lovely hubby a card and in time for the actual event! lol!  This year we had a very quiet day as we had the children at home and that doesn't lend itself much, to a romantic nigh,t but we had a lovely time.
  This card was made using a topper I had made earlier with a Stampin'Up set stamped on Stampin'Up on cream cardstock and newsprint patterned paper using black and real red ink.  It was matted onto black card and then layered onto a Dawn Bibby shaped card with dimensional glue gel and embellished with adhesive black gem swirls and adhesive black heart shaped gems.
I really enjoyed making this card andf it was so quick and simple to make.  I like it the images and feel so much I'll have to make some more of them.

Monday, 25 February 2013

Hocus Pocus!

 
Well, some would say it was "Hocus, Pocus.." or magic how I have magically reappeared back again in blogsphere after my long absence!  When I looked at the date of my last post I couldn't believe how long it has been since I've been in blog world.......how time flies!  In fact it's been so long that I feel a little out of practice, so be gentle with me it this post is pants! lol!
This canvas is a sample I made for Crafty Stamps to put on their stand at NEC to promote their new range of stamps.  They are such lovely stamps and this wizard was lots of fun to play with. I thought that I would also join in Hels Sheridan's Sunday Stamper challenge at http://pinkleart.blogspot.co.uk/2013/02/sunday-stamper-week-246-you-raise-me-up.html with this piece as it fits the theme of texture. 
I made this canvas by adhering a Tim Holtz patterned paper with matt glue'n'seal to the canvas then I used Stampendous Frantage around the edges to create texture and dimension. I then stamped the wizard image on watercolour paper, coloured with mica paints, fussy cut it and glue it to the canvas with dimensional glue gel along with a hand drawn and coloured cauldron.  I then added black gem swirls as smoke and Ideology book plate with the title "Hocus Pocus" which I filled with glossy accents.  I then finished it off with a crochet lace ribbon around the edges. 
I loved using the Frantage encrusted jewels embossing products as they were lots of fun and the Crafty Stamps image was a dream to stamp with.


Thursday, 6 September 2012

Take Time to Smell the Flowers.........

This is a canvas I made a little while ago with a combination of Dylusions Stamps and Sprays.  I gotta say that I just love Dyan Reavely's stamps.  They are quite quirky and stamp beautifully!
Firstly, I created a background on the canvas by spraying through masks and building up some layers.  I then stamped the edges with the stamp set "Around the Edge DS006" with Jet Black Archival, highlighted with gold Promarker and coloured the bottom green to mimic grass. I also stamped the small leaves from the same set onto the canvas on the sides and then onto white card which I coloured with promarkers, cut out and using Pinflair Glue Gel adhered to the canvas.
From the sets "Tallulah DS004" and "How does your garden grow DS008"  I stamped the flowers (multiple times), body, and head onto white card and coloured with Promarkers and the wings on to Angelina film sandwiched with Angelina fibres, cut out, arranged and adhered onto the canvas with glue gel, layering up the flowers to create depth and dimension, until I was happy with the composition.  I then used glitter glue to highlight the flower centres.
This project was great fun to make an I was really happy with the finished article.  I'll have to have a go at making another one of these, I think.

Monday, 3 September 2012

What a lovely pear......!

I had lots of fun making this piece.  I had not long ago bought myself some new crafty stash and wanted to have a play!  I had invested in some new stamps, tissue wrap and Indigo Blu Flitter Glu and was excited to put them all to the test.
I had a chipboard frame so I thought I would line the background with a bookpage that I had stamped with my new Dylusion background stamps in Fired Brick D.I. and a lovely new pear stamp that I found in the reduced bin which I embossed with black glitter embosing powder and coloured with Distress Inks.
The frame I covered with Tim Holtz Tissue Wrap and stamped with a harliquin and script stamps using Flitter Glu and gilding flakes.  Well, I've got to say I am now a total convert!  I loved it and it was so easy to use, yet gave a fabulous finish!  I just LOVED it!  I then attached the frame to the back with tissue tape and made a tissue tape flower with a button center and cut some tissue tape covered grungeboard into leaves to embellish the frame.  Everything was given a final spritz with Perfect Pearl Mist in copper and edged with a black promarker.
Simple but effective!

Thursday, 30 August 2012

A Bird in the Hand...............

I love altering things.......in fact I think now I rarely make a card except for family, friends and class projects.  My heart now lies with off the page and it's here that I feel most comfortable.
This project came about when I found an old lozenge style tin and thought to myself I could make something beautiful out of this! It took a while for the complete idea to form in my head but once it did it was surprisingly easy to make.
Firstly I coloured the time with alcohol inks.  I then stamped a Tim Holtz collage stamp on gloss card, which I had previously coloured in the same alcohol inks as the tin, in Jet Black Archival Ink and cut in to fit the recessed area on the lid. Once it was adhered to the lid, the stamped imaged was outlined with squiggly lines in black Enamel Accents and glitter glue and left to dry.
As embelishments, I die cut a Grungeboard bird fromTim Holtz's Sizzix bird cage die and some leaves from a die cut Grungeboard sheet that I had covered in tissue tape and coloured with inks and Inks Gold in purple.  I then coloured a paper flower with the same Inka Gold and attached them all to the tin.
I have to say this has become one of my favourite pieces, I really love how it turned out.  Hope you do too.  Thanks for visiting my blog.

Grungy Birthday Wishes

Today it is my lovely husbands, "ehem, cough cough........." 45th birthday, bless his greying cotton socks! LOL! We have all got ourselves organised and brought the pressies (even the 5 year old), the cake's about to be made and I'm all but started the requested birthday meal of beef wellington, god help me I hope it turns out ok, I've only made it once before!
So for this birthday I made him the card above with some of my favourite products.................in fact who am I kidding apart from the spellbinders dies used for the plaque, they are all from Tim Holtz and Ranger. 
Some lovely patterned paper layered with cardstock embossed with the "Bingo" embosing folder, sanded and spritzed with Perfect Pearl mist, black gloss card die cut with the "Umbrella Man", black enamel accents for rain drops, spellbinders labels die and Tim Holtz stamp.  And to finish it off some Ideology embellishments.
Happy Birthday darling, ..................Hope you like your pressies and card! xxx

Friday, 4 May 2012

"My House, in the middle of the street, My House......"

Recently, I made a canvas using Caludine Hellmuths two steps stamps. They come in two sets, one is a foam set that stamps brillantly with either inks or acrylic paints, and gives a solid image and the other is a clear acrylic stamp that gives the line detail to compliment the solid image. 
I love Caludine's style which is very retro, which comes through in all her work and I just love all of her stamp sets! In fact I had been trying to find an excuse to pull them out and have a go of my new stamps when I was struck with inspiration! I had a canvas board to use and I thought this set would make the perfect house warming gift!
Firstly, I coloured about 2/3 of the canvas board with Distress Stains to create a sky background, painted the bottom third with tan paint for the path. I then stamped the foam stamp houses, sun and "pebbles" with acrylic paint waited for it all to dry and then over stamped it with Archival ink in Jet Black.
I then repeated the process with the houses and sun on stickyback canvas, cut them out and layered onto the canvas board with glue gel. I die-cut the fence from painted sticky back canvas and using glue gel again adhered it to the canvas either side of the middle house.
I tried to recreate that retro feel by using bright colours to compliment the style of the images. I think I managed to achieve this.
I am going to enter this piece into The Artisitic Stampers monthly Challange at http://theartisticstampercreativeteam.blogspot.co.uk/2012/05/may-challenge-spots-and-stripes.html, which this months theme is "Spots and Stripes".  I definetly think it fits the theme and I really enjoy entering different challenges so I can see how other people interpret the themes set by the designers.  I find it helps the creative juices flow.  I love The Artisitc Stampers design style and hope I do well inthe challenge!


Tuesday, 1 May 2012

Bunting Mad...

Just a quick entry tonight as I am shattered!  It has been a hectic day at work and with meetings following, it would all be easier if I could just start to sleep properly!  Aaarrggggghhhh.................!
Well, they always say you feel better after a good aaarrrggghhh!  Now I do! lol!
This is a card I made with my Stampin'Up stash and it is one that always brings a smile to my face.  Which I think is a good thing seeing as it's a birthday card!lol.
I think that it is the paper that makes is so appealing, it so nice, bright and happy. I can't help but feel better looking at it.  It's such a simple card to make too. Just cover a card blank with patterned paper, put a triangular piece at a jaunty angle with a little twine attached to each side, punch a decorative circle and a slightly smaller one of white card to fit inside it.  Stamp the birthday cupcake two-step stamp and embellish it with chunky glitter.
Stamp the sentiment in the bottom right hand corner, and , voila!
Happy Birthday!
As this is such a bright card for me, which makes a change from my usual colour choices, I thought I would enter it into Simon Says Stamp "A Kaliedoscope of Colour" challenge at http://simonsaysstampandshow.blogspot.co.uk/2012/04/simon-says-stamp-and-show-kaleidescope.html.  It is so unusual for me to make such a clean bright design and in fact I really enjoyed making it and love how it looks finished.  So think I will have to try and incorporate this style into my crafting more often.
Thanks for stopping by and taking to the time to look at my blog.

Monday, 30 April 2012

A Stitch in Time

It has just recently been my best friends birthday and this is the card I made her.  She is a keen patchworker and when I saw this die from Tim Holtz I just knew I had to use it in a card for her!
I used the Tim Holtz "Vintage Shabby" paper stack and layered a sheet, which had been altered with Kaiser Kraft rub-ons - not something I use often, on some dark brown card and then on a kraft card base.  I embossed some tan co-ordinations card with the sewing theme embossing folders and layered on an embossed piece of dark brown card.  I die cut the dress form and cotton reel from wood effect card enhanced with glossy accents, layered with a stickyback canvas body section the had been stamped with measuring tape, wrapped some tape ribbon around the reel and then adhered to the card with glue gel.  I then embellished wth flowers, a button and scabble letters.
I really hope she likes this card as she is such a great friend, we have known each other for so long and I love making cards for someone who appreciates them as much as she does. I am going home on holidays in May and she is coming to visit so I look forward to spending time with her and giving her, her birthday present!
I also decided to enter this card in one my favourite challenges and that is Sunday Stampers run by Hels Sheridan at http://pinkleart.blogspot.co.uk/2012/04/sunday-stamper-week-203-little-red.html.  This week the theme is Little Red Corvette, with red the colour feature of the week. Fingers crossed!

Wishes

At the SECC Christmas Hobbycraft Show in Glasgow, I succumbed and bought IndigoBlu's Flitter Glu with no high hopes for it working very well, based on past experience with these types of glues.  However, I am wrapped to be able to say that it is every bit as good as they say and I was so happy with it that I haven't stopped using it since!  Hence the above piece of artwork.
I was walking around Ikea one day and saw this black mirror for sale for just over a pound and the brain went into overdrive! Oh, the things I could do with that I thought! So I bought it, took it home and attacked it with flitter glu, gilding flakes and the gorgeous IndigoBlu poppy stamp set. I then embellished it with Tim Holtz Butterfly stamps and a sentiment, a spellbinders butterfly die cut from embossing metal and some adhesive gems.
It was all sealed with a coat of Spray'n'Shine to protect it and give a nice shiny finish and voila!

Saturday, 26 November 2011

Altered Tin

Recently I entered a swap on UK Stampers to alter a 400g tin. After a lot of contemplation I decided that I wanted it to be very industrial looking and was heavily influenced by the Steampunk style of artwork, which is very popular at the moment. After I had finished it I was partaking in a little of my other favourite pastime (other than crafting, that is! lol!), which is bloghopping and I came across two blog challenges that my newly altered tin was suitable for. So, I decided to enter it in them as well. One was the Grungy Monday Challenge Blog www.studiol3.blogspot.com/2011/11/grungy-monday-28-and-great-big-prize.html and the theme was "Techniques of Tim - Great Pumpkin Challenge" using the techniques of metal embossing and alcohol inks, both of which I utilised in this project. Here is a link to the pumpkin that Tim created, it's amazing as always and well worth a look www.timholtz.typepad.com/my_weblog/2011/11/rangers-great-pumpkin-challenge.html . The other was the Creations by Gill M blog www.creationsbygillm.blogspot.com/2011/11/cbgm-blog-challenge-20-recycling.html ,whose challenge was to recycle something. As my tin had originally been a can of Heinz Tomato soup my daughter had for dinner I thought that it fitted the criteria.

So, onto how I made this altered tin. I firstly embossed some foil with a cuttlebug embossing folder then adhered it to the tin using red-line tape. I put copper memory foil around the top and bottom to hide the join, and then alcohol inked the inside and outside of the tin.

I die cut the cogs from aluminun foil covered grungeboard using a Tim Holtz Alteration Die and coloured them with alcohol inks. I stamped the steampunk image from a Paperartsy set onto some of their metal foil card, cut out and attached to the tin with glue gel. I then added the grungeboard clogs and embellished the tin with Ideaology metal cogs, a book plate with another stamped image from the same stamp plate in it which was sealed with Glossy Accents, chain, jump rings, clasps and tags.

For the base I die cut a scalloped circle from grungeboard, painted it with black acrylic paint, embossed using the same embossing folder, sanded it to reveal the core and highlighted it with Inka Gold in Lava Gold. I attached it to the bottom of the tin with glue gel and then attached four small cotton reels that I had also painted black and highlighted with Inka Gold.

And there you have it my take on a Steampunk themed altered tin. Hard to believe that it used to be a Heinze Tomato Soup tin isn't it?

Friday, 25 November 2011

Dream Doll

It all started with an empty ribbon reel that I was determined to create something with rather than just throwing it away. It ended up sitting on my desk for what seemed like ages, until I was hit with inspiration!


I had been wanting to make something with my Tim Holtz dress form alteration die for a while and had, had vague ideas of what I wanted to do.......something 3-dimensional, using the beaded ribbon I had got at the SECC show this year. All of a sudden as I was staring at the ribbon reel it all came together in my head and I knew exactly what I wanted to make............. a 3-D decorative dress form statue, and thankfully it ended up just as I had imagined!


I used the alterations die to cut two dress forms from grungeboard and decorative papers (ensuring I cut a mirror image for the back), covered the grungeboard dressform, cotton reeel and button in text paper, trimed the decorative paper to fit just the body, adhered and distressed with distress inks. Once the glue was dry I stuck the front and back together with a coffee stirrer in the middle to give it strength and a way in which to attach it to the ribbon reel.


Meanwhile I painted the ribbon reel with Inka Gold "Lava Gold" and then used a mask, embossing paste and glitter to create the pattern on the bass. Once that was dry I filled the hole in the centre with glue gel and stuck the coffee strirrer at the bottom of the dress form in it and supported it until it was dry and firmly upright.


Now came the fun bit........embellishing! I used Tim Holtz Ideaology for the wings, and coat hanger clip, a paper flower, ribbon from a hanging tab on some clothing, hat pins, beads, a stamped Tim Holtz "Adage Ticket", glitter glue, the beaded ribbon I had got at a show, the button and cotton reel and a brass scissor embellishment, using glue gel to adhere. Once they were all as I wanted I spritzed the whole thing with Perfect Pearls mist in Heirloom Gold.


And there you have it my completed dream recycled project, now what else can I re-use?


I am going to enter this piece in the Simon Says Stamp and Show challenge "Tickets"; www.simonsaysstampandshow.blogspot.com/2011/11/simon-says-stamp-and-show-some-tickets.html


as I think it fits in with the theme, I hope you all do too.

Sunday, 2 October 2011

The A-Z of ME!

I was blog hoping and stopped by a friend at "Ink Blots". Hi Siobhan! Loving your work! Only to find that she had answered a questionaire on herself, that she had found on Dyan Reaveley's blog, from AFTH fame. I thought this was a great idea and a lot of fun so went straight to Dyan's blog and had a read of her answers. It's such a great way to get to know a little about someone, and I gotta say I am a huge fan of Dyan! So I thought I would give it a go and see what I found out about me! Just changed one question as I'm not a huge fan or either rhubarb or custard! So here goes..........................
A. AGE? 40
B. BED SIZE? King Size
C. CHORE THAT YOU HATE? All of them! But especially the bathrooms!
D. DOGS? Not at the moment...love them but can't have any as hubby allergic!
E. ESSENTIAL START TO YOUR DAY? A cup of coffee!
F. FAVOURITE COLOUR? None! Cause as my daughter would say, "I love them all"!
G. GOLD OR SILVER? Gold please!
H. HEIGHT? 5' 11"
I. INSTRUMENTS YOU PLAY? None. Used to play recorder and guitar very badly...does that count?
J. JOB TITLE? Staff Nurse
K. KIDS? 2 stepsons Alistair 16 and Ian 14 and daughter Georgia 4 1/2
L. LIVE? Edinburgh, but dream to be back in the sun and warmth of Oz! That's Autralia not the land of OZ as in "The Wizard of Oz"
M. MUST HAVES? Everything paper crafty! Especially by Tim Holtz!
N. NICKNAMES? Rita or Reet
O. OVERNIGHT HOSPITAL STAYS? Two many to count, many admissions as a child, not as many as an adult, and my daughter.
P. PET PEEVES? Bad service!
Q. QUOTE FROM A MOVIE? "Ompaa, Lompaa..................." the song from Charlie and the Chocolate Factory, the original one.
R. RIGHT OR LEFT HANDED? Right
S. SAVE OR SPEND? Spend, spend, spend! Much to my husbands dismay!
T. TEA OR COFFEE? Coffee, absolutely! Can't abide by tea.
U. UNDERWEAR? Not a pretty thought! But love a matching set!
V. VEGETABLE YOU HATE? Pumpkin! Yuccch!
W. WHAT MAKES YOU RUN LATE? The family! I hate being late!
X. X-RAYS YOU'VE HAD? Wrists and ankles, used to be a clumsy child!
Y. YUMMY FOOD THAT YOU MAKE? Smoked salmon! Can't get enough of it! YUMMMMY!!!!!!!!
Z. ZOO ANIMAL? Elephant and giraffe, but not in a zoo only in the wild where they belong!


So........what do you think? Why don't you have a go too and leave me a link and I'll come and learn a little about you too.

Saturday, 1 October 2011

Resist with Rollagraph

Today I gave a wee demo on the Rollagraph and put it through it paces, so that my ladies could see just what it was capable of, not just rolling in a straight line in one colour of ink!

Whilst I was prepping for this demo (or at least while I should have been prepping for it) I went for a wee blog hop and stopped in on one of my favourite peeps, Hels Sheridan and her blog "Ink on my Fingers" and guess what.............she was hosting a challenge on Sunday Stamper http://www.pinkleart.blogspot.com/2011/09/sunday-stamper-week-173-simply.html for resist techniques! And low and behold I was making a card using the rollagraph and versmark ink to create a resist background. And I have to confess that "Simply Irresistable" was one of my favourite songs n the eighties!

Now, I know it isn't as aristic and beautiful as Hels but I don't often do "clean and simple" as I love to ink and distress, so for me this was a nice change of pace and direction.

I restamped the image a few more time coloured with promarkers and spritzed with Prefect Pearls and used Glossy Accents and glitter on their centres to create the embellishements and cut the card blank and mats with my new Grand Calibur and Go Kreate dies! Woo Hoo they are fab!

Hope you like it.