Thank You for Following My Blog

Thursday 29 August 2013

Creating with the Melt Pot

 
I have recently been inspired to start playing with my melt pot again and I thought I would enter this into Hels Sheridan's Sunday Stamper challenge of "metal". I had a paper mache box which I decided to alter using the melt pot, and I wanted to incorporate as many techniques as I could.
I started by colouring the base of the box by spraying it with acrylic paint which I had diluted and put in a mister bottle.  When you do it this way it doesn't take long to dry.  I then stamped on it with Peacock Feathers Distress Ink and a Ranger peacock feather texture tread.
For the lid I used beeswax to adhere some Tim Holtz tissue wrap and then overlayed with parts of a paper napkin. I dipped the edges of the lid in the melted marbelized UTEE and then quickly pressed them into the texture tread. The embellishments were made with UTEE as well, the heart was made by pouring the UTEE into a cookie cutter which was sitting on the texture tread and allowed to cool.  The flower and leaves were dipped into melted clear UTTE to create faux enamelling.
Once I was happy with how they looked they were adhered with glue gel and a metal key with a ribbon tie was added to the heart.  I then spelt out "craft" with Tim Holtz plastic letters, but you could put whatever you like.
If you want to join in this challenge or just have a look at the sample, here is the link;


Travel to Paris - The Artistic Stamper Creative Team Challenge


Here is my entry for the Artistic Stamper's Challenge,"Postcards, Travel and Holidays".  This is a relatively simple but striking canvas was quick and easy to make, and I particularly like the monochrome colour scheme.
I took a deep edge 3" x 3" canvas and layered up Paris themed patterned paper and black card, distressed it with Black Soot Distress Ink and glued it to the canvas.  I then took a smaller piece of patterned paper and again matted it onto black card, distressed it with Black Soot and adhered it off centre and slightly to the right of the canvas.
The focal point is a of the canvas is a domino sized piece of chipboard that I cover with the patterned paper.  I stamped the image of the Eiffel Tower from the Stampin'Up "Artistic Etchings" in Jet Black Archival and distressed the edges with Back Soot.  I glued Champagne glass glitter along the bottom of the image and then covered the tile with embossing ink and triple embossed it with clear UTEE to create faux enamelling. The tile was then matted onto black card and glue to the canvas so that it overlapped both of the panels already on the canvas.
To finish off the canvas I wrapped with black and cream stripped grosgrain ribbon and as simple as that the canvas is completed. If you want to see more entries to this challenge pop over to their blog, here is the link; http://www.theartisticstampercreativeteam.blogspot.co.uk/2013/08/august-challenge-postcards-travel-and.html
Thanks for stopping by my blog and I hope you have a good week.

Monday 26 August 2013

Making a Silk Purse from a Sows Ear..............

 
I have been doing a series of classes at Stampers Grove in Edinburgh on "Recycle, Re-Purpose, Re-Use" and this gorgeous jar is one of the class projects that I designed.  It started life as a simple jam jar but after it was finished I decided to re-purpose it into storage craft storage for my extremely messy craft room.  Which is in desperate need of organisation and attractive storage solutions. Lol!
After washing and drying the jar I cut 2 strips on co-ordinating card stock and punched a border pattern along the edges.  I layered these strips of card and then glued them to the jar.  I used Spellbinder dies to cut the 3 label dies in the same coordinating card, layered then, threaded pink poker dotted ribbon through the sides, secured with brads and the attached them to the border strip on the jar.  Then embellish the bottom left and top right with die cut leaves and paper roses.
The lid is made by covering the top with a card circle which you have used the lid to draw around as a template.  The using my spellbinder dies I die-cut 2 circles from the same colour card as used on the jar and attach them to the lid.  I then used Creative Expression's Pearl PVA Glue to create faux pearls around the edge of the largest die-cuts and attached some die-cut leaves and a large paper rose to the centre of the top die-cut.
For the edges of the lid I colourised some paper doilies and then cut off the edges which I used to create 2 rows of pleated ruffles and the finished off with the same pink poker dot ribbon that was used on the labels on the jar.  And there you have it a beautifully decorated jar that can be used as storage or to give as a gift to someone special.


Saturday 24 August 2013

Clean and Simple

This week while blog hopping I found a challenge at the Addicted to Stamps blog, It was my first time entering this challenge but I thought I would give it a go.  If you want to check this challenge out here is the link, http://addictedtostamps-challenge.blogspot.co.uk/2013/08/cas-with-twist-challenge-59.html ,whose theme was Clean and Simple with a twist, the twist being that there was three options to choose from which were;
OPTION 1
Create a CAS (Clean and Simple) project

OPTION 2
Create a project that incorporates a Nicecrane Design Image

OPTION 3

Combine the two and create a CAS project with a Nicecrane Design Image. 
 
 I decided to try Option One - Clean and Simple, as this is not a style I use very often.  My usual style is vintage chic, distressed or grungy.  So I thought this was a great opportunity to try something outside my normal comfort zone.
  Here is the card that I came up with.  I used two stamp sets I have from when I was a Stampin'Up Demonstrator.  The flower image was stamped using their two step stamping set called Simply soft, with the solid image being coloured with markers and the line image stamped in brown ink. The sentiment used was from the Faith in Nature set.  I used the Stampin'Up label dies to cut the mats for the flower image and layered them on white card which I then matted on the same pink card that was used to mat the flower. I really like the sentiment I think it lovely and is perfect with the image. 
I am really happy with the finished result, I hope you like it.


Thursday 22 August 2013

Wedding - Stampotique Designers Challenge SDC113

As I was blog hopping today I popped over to one of my favourite challenge sites which is Stampotique and saw that this weeks challenge theme was weddings.  I thought to myself that I had just the perfect stamp for this and it was another Crafty Stamps image.  They are a local stamp company owned by the same people that own Stampers Grove in Edinburgh and they have lovely stamps with really quirky images.
For this card I thought that I would keep it really simple as I think that that compliments all the finery of a wedding without clashing.  So used a simple white 8" x 8" card with scallop edges and embossed it with a swirl mask through the Grand Callibur, I then went around the edges with Creative Expressions Pearl PVA glue to create a border of faux pearls.  I put the card aside to dry and carried on by stamping the image of the couple in black on white card and heat embossed with clear embossing powder.  I then placed the smaller of the two spellbinder dies so that the stamped imaged was centred and die-cut it.  I used the next size up to make the black mat.  I layered the mats with dimensional glue added the veil to the lady and adhered it to the card base, again with dimensional glue.  Once I was happy with the position of the main image I added the pearl swirls to the top right and bottom left.
And there you have it, a quick, simple but elegant wedding card.
If you want to pop over and see what's happening on this months challenge here is the link;
Happy stamping!

Wednesday 21 August 2013

Carnival - Simon Says Stamp and Show Challenge

 Hi! Just a quick post today as I have come back onto blogger with a vengeance! I know, can you believe it.......3 posts in two days! A first for me!
Well, I saw the challenge at Simon says Stamp and Show and just had to have a go.  I have these  3celebration stamps from Crafty Stamps which are; party hats, candles and balloons, and I thought that they really fitted the theme of carnival when combined with bright and exciting colours!  Maybe not in the traditional sense of the circus etc. but more in the sense of fun, laughter and parties!  I had so much fun playing with these stamps, that my mind was overflowing with ideas.  I couldn't decide which one I like best so I decided to enter them both.  I hope that is OK?
So if you want to pop over and see whats happening at the Simon says Stamp and Show Challenge Blog here is the link
I hope you like my cards.
Have a good week.

Tuesday 20 August 2013

Sunsets

 
I am taking a class at Stampers Grove in Edinburgh in September on making cards with stencils and masks and I had loads of fun playing and coming up with idea after idea.  This card is just one of five that I made and am posting it so as to temp people to come along to the class.  I will post them all closer to the class.  I hope that the lovely people that come along are able to finish all off them in the allotted time.  We, we can only but try and at least if they don't finish they can go away with lots of ideas.
I really loved playing with the stencils and masks to create this card as it was so quick and easy but resulted in such a striking card.  With this card I made my own stencil, by die-cutting the label shape from an inking mat and then inking through it with distress inks in sunset colours, I also continued these colours around the edge of the stencil as the piece of card was slightly larger than the stencil.  I then used black embossing paste through a Flower stencil which was layered over the original stencil so that it only went in the inked area.  Once it was all dry I edged all the inked areas which a black fine liner.  I then inked a chipboard tag and stamped it with the word "SMILE".
This week I am going to enter this in Hels Sheridan's Sunday Stamper Challenge, which this week theme is "Waterloo Sunset", sunset/sunrise colours.  You find this blog at
http://pinkleart.blogspot.co.uk/2013/08/sunday-stamper-week-271-waterloo-sunset.html
I hope you all like my contribution to this challenge, it is my first for a while so I am just getting myself back into the grove.

Return from the Wilderness


Well Here I am.........returned from the wilderness! Lol!  Sorry I have been absent from the blogsphere for so long.  It's the combination of school holidays and becoming more than a little acquainted with the route from our house to the children's hospital in town here as I have been taking our youngest back and forth from appointments.  But the kids are back to school and I am back now and looking forward to spending more time blog hopping.
                         
Earlier this year myself and the family holidayed in Australia and went to a family wedding.  While we were there I went to a class at a local craft shop where I made this gorgeous canvas.  I had such a fantastic time and am really happy with the way it turned out.  During the class I learnt all about using a grounding medium on the canvas so as the be able to use Pan Pastels and get a vibrant colour result as well as about the Faber Castell PITT Big Brush India Ink pens for shading.  I just love these now and NEED them all! Lol..

We started by adhering scraps of patterned paper with matt medium, then applying a coat of a grounding paste for pastels, then using the Pan Pastels to create a coloured background (just LOVED this part and can't wait to get my hands on some of that grounding medium).  Using crackle, random alpha and reversed chicken wire stencils, stamps and inks we created pattern and layer, until we were happy.  Then we sprayed it with a fixative.
Now the fun part.......creating the scene and embellishing the canvas! Yeah! The door was made using a chipboard rectangular frame with strips of chipboard to create the dividers, it was then painted brown. In three of the door panes a scrap of script paper was adhered behind the apertures. The arch was made using a Tim Holtz distressed clock die which was cut to fit the door and then painted in a turquoise metallic paint. Glue the door and arch to the left hand side of the canvas and then distress the script panels with turquoise embossing panels. Add a  Tim Holtz hitch fastener as a door handle and hang a chipboard key on it that has been coloured and distressed.  Once the door is in place cut a piece of card to look like a doormat and stencil with the crackle mask and stamp and glue in place and embellish with coloured baby paper roses and metal butterfly, that has been coloured with alcohol inks.
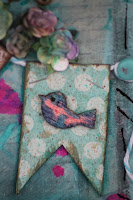
The bunting was made by cutting strip of co-ordinating patterned paper, folding and gluing over bakers twine and a "V" cut into it. The drape over the top right hand corner of the canvas and adhere with dimensional glue.  Cut the tops of some co-ordinating brads and glue at either end of the bunting. Next embellish above the bunting with baby paper roses that have been spritzed and a metal dragonfly.  If you look very closely, you will see that I have put two tiny wooden birds that I have coloured with distress stains and placed one on the bunting and the other on a door panel.
The words were stickers that were shaded and stuck on thick card to give it a bit of strength than glued to the canvas on the right hand side under the bunting.
Once I was happy with the positioning of all the elements I shaded around all of the pieces with the PITT Big Brush India Ink pens to create shadow and depth by laying done the ink and then rubbing it in with my finger to blend it ( which can be done because of the coat of matt medium allows it to blend)and help the elements look like they are part of the canvas rather than being just stuck on top.  To finish off the canvas I went edge with a black marker roughly to create frame and tie everything in together.
I had a ball making this and hope to really get into creating more canvases and larger ones.  I hope you like it.
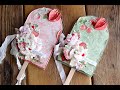