Thank You for Following My Blog

Saturday 26 November 2011

Altered Tin

Recently I entered a swap on UK Stampers to alter a 400g tin. After a lot of contemplation I decided that I wanted it to be very industrial looking and was heavily influenced by the Steampunk style of artwork, which is very popular at the moment. After I had finished it I was partaking in a little of my other favourite pastime (other than crafting, that is! lol!), which is bloghopping and I came across two blog challenges that my newly altered tin was suitable for. So, I decided to enter it in them as well. One was the Grungy Monday Challenge Blog www.studiol3.blogspot.com/2011/11/grungy-monday-28-and-great-big-prize.html and the theme was "Techniques of Tim - Great Pumpkin Challenge" using the techniques of metal embossing and alcohol inks, both of which I utilised in this project. Here is a link to the pumpkin that Tim created, it's amazing as always and well worth a look www.timholtz.typepad.com/my_weblog/2011/11/rangers-great-pumpkin-challenge.html . The other was the Creations by Gill M blog www.creationsbygillm.blogspot.com/2011/11/cbgm-blog-challenge-20-recycling.html ,whose challenge was to recycle something. As my tin had originally been a can of Heinz Tomato soup my daughter had for dinner I thought that it fitted the criteria.

So, onto how I made this altered tin. I firstly embossed some foil with a cuttlebug embossing folder then adhered it to the tin using red-line tape. I put copper memory foil around the top and bottom to hide the join, and then alcohol inked the inside and outside of the tin.

I die cut the cogs from aluminun foil covered grungeboard using a Tim Holtz Alteration Die and coloured them with alcohol inks. I stamped the steampunk image from a Paperartsy set onto some of their metal foil card, cut out and attached to the tin with glue gel. I then added the grungeboard clogs and embellished the tin with Ideaology metal cogs, a book plate with another stamped image from the same stamp plate in it which was sealed with Glossy Accents, chain, jump rings, clasps and tags.

For the base I die cut a scalloped circle from grungeboard, painted it with black acrylic paint, embossed using the same embossing folder, sanded it to reveal the core and highlighted it with Inka Gold in Lava Gold. I attached it to the bottom of the tin with glue gel and then attached four small cotton reels that I had also painted black and highlighted with Inka Gold.

And there you have it my take on a Steampunk themed altered tin. Hard to believe that it used to be a Heinze Tomato Soup tin isn't it?

Friday 25 November 2011

Dream Doll

It all started with an empty ribbon reel that I was determined to create something with rather than just throwing it away. It ended up sitting on my desk for what seemed like ages, until I was hit with inspiration!


I had been wanting to make something with my Tim Holtz dress form alteration die for a while and had, had vague ideas of what I wanted to do.......something 3-dimensional, using the beaded ribbon I had got at the SECC show this year. All of a sudden as I was staring at the ribbon reel it all came together in my head and I knew exactly what I wanted to make............. a 3-D decorative dress form statue, and thankfully it ended up just as I had imagined!


I used the alterations die to cut two dress forms from grungeboard and decorative papers (ensuring I cut a mirror image for the back), covered the grungeboard dressform, cotton reeel and button in text paper, trimed the decorative paper to fit just the body, adhered and distressed with distress inks. Once the glue was dry I stuck the front and back together with a coffee stirrer in the middle to give it strength and a way in which to attach it to the ribbon reel.


Meanwhile I painted the ribbon reel with Inka Gold "Lava Gold" and then used a mask, embossing paste and glitter to create the pattern on the bass. Once that was dry I filled the hole in the centre with glue gel and stuck the coffee strirrer at the bottom of the dress form in it and supported it until it was dry and firmly upright.


Now came the fun bit........embellishing! I used Tim Holtz Ideaology for the wings, and coat hanger clip, a paper flower, ribbon from a hanging tab on some clothing, hat pins, beads, a stamped Tim Holtz "Adage Ticket", glitter glue, the beaded ribbon I had got at a show, the button and cotton reel and a brass scissor embellishment, using glue gel to adhere. Once they were all as I wanted I spritzed the whole thing with Perfect Pearls mist in Heirloom Gold.


And there you have it my completed dream recycled project, now what else can I re-use?


I am going to enter this piece in the Simon Says Stamp and Show challenge "Tickets"; www.simonsaysstampandshow.blogspot.com/2011/11/simon-says-stamp-and-show-some-tickets.html


as I think it fits in with the theme, I hope you all do too.

Sunday 2 October 2011

The A-Z of ME!

I was blog hoping and stopped by a friend at "Ink Blots". Hi Siobhan! Loving your work! Only to find that she had answered a questionaire on herself, that she had found on Dyan Reaveley's blog, from AFTH fame. I thought this was a great idea and a lot of fun so went straight to Dyan's blog and had a read of her answers. It's such a great way to get to know a little about someone, and I gotta say I am a huge fan of Dyan! So I thought I would give it a go and see what I found out about me! Just changed one question as I'm not a huge fan or either rhubarb or custard! So here goes..........................
A. AGE? 40
B. BED SIZE? King Size
C. CHORE THAT YOU HATE? All of them! But especially the bathrooms!
D. DOGS? Not at the moment...love them but can't have any as hubby allergic!
E. ESSENTIAL START TO YOUR DAY? A cup of coffee!
F. FAVOURITE COLOUR? None! Cause as my daughter would say, "I love them all"!
G. GOLD OR SILVER? Gold please!
H. HEIGHT? 5' 11"
I. INSTRUMENTS YOU PLAY? None. Used to play recorder and guitar very badly...does that count?
J. JOB TITLE? Staff Nurse
K. KIDS? 2 stepsons Alistair 16 and Ian 14 and daughter Georgia 4 1/2
L. LIVE? Edinburgh, but dream to be back in the sun and warmth of Oz! That's Autralia not the land of OZ as in "The Wizard of Oz"
M. MUST HAVES? Everything paper crafty! Especially by Tim Holtz!
N. NICKNAMES? Rita or Reet
O. OVERNIGHT HOSPITAL STAYS? Two many to count, many admissions as a child, not as many as an adult, and my daughter.
P. PET PEEVES? Bad service!
Q. QUOTE FROM A MOVIE? "Ompaa, Lompaa..................." the song from Charlie and the Chocolate Factory, the original one.
R. RIGHT OR LEFT HANDED? Right
S. SAVE OR SPEND? Spend, spend, spend! Much to my husbands dismay!
T. TEA OR COFFEE? Coffee, absolutely! Can't abide by tea.
U. UNDERWEAR? Not a pretty thought! But love a matching set!
V. VEGETABLE YOU HATE? Pumpkin! Yuccch!
W. WHAT MAKES YOU RUN LATE? The family! I hate being late!
X. X-RAYS YOU'VE HAD? Wrists and ankles, used to be a clumsy child!
Y. YUMMY FOOD THAT YOU MAKE? Smoked salmon! Can't get enough of it! YUMMMMY!!!!!!!!
Z. ZOO ANIMAL? Elephant and giraffe, but not in a zoo only in the wild where they belong!


So........what do you think? Why don't you have a go too and leave me a link and I'll come and learn a little about you too.

Saturday 1 October 2011

Resist with Rollagraph

Today I gave a wee demo on the Rollagraph and put it through it paces, so that my ladies could see just what it was capable of, not just rolling in a straight line in one colour of ink!

Whilst I was prepping for this demo (or at least while I should have been prepping for it) I went for a wee blog hop and stopped in on one of my favourite peeps, Hels Sheridan and her blog "Ink on my Fingers" and guess what.............she was hosting a challenge on Sunday Stamper http://www.pinkleart.blogspot.com/2011/09/sunday-stamper-week-173-simply.html for resist techniques! And low and behold I was making a card using the rollagraph and versmark ink to create a resist background. And I have to confess that "Simply Irresistable" was one of my favourite songs n the eighties!

Now, I know it isn't as aristic and beautiful as Hels but I don't often do "clean and simple" as I love to ink and distress, so for me this was a nice change of pace and direction.

I restamped the image a few more time coloured with promarkers and spritzed with Prefect Pearls and used Glossy Accents and glitter on their centres to create the embellishements and cut the card blank and mats with my new Grand Calibur and Go Kreate dies! Woo Hoo they are fab!

Hope you like it.

Thursday 4 August 2011

What if your Fears and Dreams...............

I know I can't believe it either....................two posts in one day! It's just me trying to get myself organised before I start my enforced break from blogger due to that horrible four letter word......................WORK!!!


Tonights blog is on the entry I have made for The Sunday Stamper http://www.pinkleart.blogspot.com/2011/07/sunday-stamper-week-165-waterloo-sunset.html whose theme this week is "Waterloo Sunsets" and The Stampotique Designers Challenge http://www.stampotiquedesignerschallenge.blogspot.com/ whose theme this week is "Red,Yellow and Orange".

It is a framed piece of art in the colours of Sunset. I created a background with paints and sprays through masks and stencils and then a ray stamp. I then stamped the gorgeous Stampotique girl (well, I don't know if gorgeous is the right word.........but I love her!) and highlighted her hair with black Enamel Accents, gave her a crown and some keys. I stamped a sentiment then cut it up and placed it on the image and outlined in black. Once I was happy with the artpiece, I put it in a frame that I had coloured with the same spray inks and micas, after coating it with firstly with white acrylic paint. Once the inks were dry I covered it with Rock Candy Distress Crackle Paint and once that was dry I edged the frame with Inka Gold in Lava Gold. I think it has turned out ok. What do you think?

Time to Colour!

Just recently I have done a demo on using Letreset Promarkers and
Tim Holtz Distress Inks. I really enjoyed myself, as these are two of my favourite mediums to craft in! I have just LOVED Distress Inks for years now as they are so versatile and easy to use. The colours are just delish too! I was only introduced to Promarkers just over a year ago but have not looked back. It takes your colouring to another level and it so easy to loose yourself whilst colouring and disappear into your own little world! Which, I must admit, I do often!
The first card was coloured using Promarkers, including the background. Which is one of the reasons I love them, as it allows you to block colour an area, like the sky on this card, whilst achieving a smooth finish that is impossible to achieve with other mediums, or at least I can't achieve it! You can also creating shading and blends bands of colour so that you have a graduated background, eg. sunrise or sunset.
The above card used Distress Inks where the stamp was sprayed with water once inked and befored being stamped to create a watercolour effect.

The third card used Distress inks as a watercolour medium to created tis coloured flower, and Spellbinder dies to matt and layer the completed image.
The next card was created by making a "wrinkle-free" Distress Ink background where you swipe the ink pads on a craft mat, spritz with water and swipe the card stock through it to create a coloured background. I then stamped on it with Archival ink and cut the two images out and layered them onto a embossed cardstock.
The next card is a Gorguss Girl stamp that has been coloured with Promarkers. Now in my opinion, these stamps just lend themselves to Promarkers and the shading that can be achieved with these pens. They give you such a professional result and you don't even have to be that good at using them for the end result to look fabby!

The last card is one of my favourite stamps and it is a Stampendous "Gerbra" image that I have coloured, again, with Promarkers. I just love the way I have been able to shade the image and achieve a smooth finish but still suggest some dimension to the flower! I then glittered the centre with Stickles glitter glue and framed it with a Spellbinders die cut frame.

It was then layered onto a simple square white card with dimensional adhesive and embellished at opposing corners with rhinestones that had been colour matched with the Promarkers. Another great use for the versatile pens!

Tuesday 2 August 2011

Tagged Men!

This week the challenges at Simon Says Stamp and Show http://www.simonsaysstampandshow.blogspot.com/ and The Artistic Stamper http://www.theartisticstampercreativeteam.blogspot.com were "Tags" and "Men" respectively. So I created this tag to fit both themes.

I coloured the tag with Distress Inks and then over stamped it with Archival Ink in Black and Coffee using Tim Holtz stamp sets "Steampunk", "Mini Holidays" and "Psychedelic Grunge". Got to say I am just loving his stamps at the moment and using them in almost everything I am making.

I then embellished it with Ideology pieces, a Creative Expressions screw brad and an Alterations die cut ticket stamped with Creative Expression "ticket" stamp set. Gave it a quick rub over with Distress Stickles and then used Ranger Enamel Accents in Black to highlight the Steampunk Gentlemen.
Once it was dry I matted and layered it onto copper glitter card and dark brown cardstock. And voila...........a tag is created!

Saturday 30 July 2011

Back to Black

Earlier this week I was blog hopping and found Hels Sheridans Sunday Stamper Challenge site Http://www.pinkleart.blogspot.com/2011/07-sunday-stamper-week-164-back-to-black.html Which was this week in memory of the death of Amy Winehouse and thus themed "Back to Black" after her song and album of the same title. I had often see Hels talking about this weekly challenge in her blog and thought about taking part but this week was my first time and I was inspired by the chosen theme.

So I got my thinking cap on and this is what I came up with.................an altered canvas in predominately black, with highlights of purple!I love working on canvases, but don't always have enough inspiration to create something worthwhile so I am really happy with how this one turned out. Firstly I painted the canvas in Adirodack Pitch Black Dabber and then used a Crafters Workshop mask and Dreamweaver pearlescent embossing paste to create the background. I then rubbed some purple Inka Gold around the edges to give some definition to the canvas.

The panel was a Wendy Vecchi stamp in Archival Black on white card which was then distressed and layered on the black gloss card. I double stamped the TimHoltz sentiment in Archival Black and Purple Inka Gold. The Tim Holtz "Man with Umbrella! was die cut and then stamped in White Imagination Crafts Chalkies ink with another Tim Holtz stamp! (Can you see a theme here? I adore Tim Holtz products!) I then layered it up with Pinflair Gel and adhered it to the topper. I embellished it with and Ideology clock face and spinner and raindrops created with Ranger Enamel Accents. The topper was adhered to the canvas with Pinflair over a piece of seam binding tape that had been colour altered with Inka Gold to match the project and embellised with an Ideology Philosphy Tag. I added Ideology Numerals which had been coloured with Adirondack Alcohol Inks to match the project and I chose "27" as that was Amys' age when she died. as well as Hels Sunday Stamper Challenge I am also entering this piece in the Simon Says Stamp and Show Challenge http://www.simonsaysstampandshow.blogspot.com which is "Anything Goes" this week. I really enjoyed making this piece and having a theme helped get my mojo back in form! Hope you like it!

Wednesday 27 July 2011

It's All About T!m

As you can probably tell I am on holidays at the moment which is why I am able to take part in these lovely challenges! It is really fun to be given a theme and get the creative juices flowing to come up with an idea for a project.

Todays effort is being entered into two challenges:The Stamp Man fortnightly challenge http://www.thestampmanchallenges.blogspot.com/

which is "All Things T!m" this fortnight andT!m Holtz Grungy Monday http://www.studiol3.blogspot.com/ whose weekly challenge this week is "Get Ready to Rock!".
So I created this little masterpiece by covering a canvas board in an old book page and distressing with distress inks. I then stamped with Dylusions border stamps and distessed the edges with Adirondack dabbers in black and gold. Once the background was finished I embellished with T!m Holtz Alterations die cuts in Grungebord which were coloured with Tim Holtz Distress Crackle paint in different colours and then coated with Rock Candy. After that they were rubbed with black dabber to bring out the cracks. I then arranged them on the background adding the T!m Holtz Ideology pieces, a couple of Creative Expressions stamped tickets, an old recalimed key, some gems and a final spritz of Prefect Pearls spray. And Voila! I call it.............."Time Flies when Creating Art!"
If you love T!m Holtz as much as I do and want to see more of his work why not head over to his blog http://www.timholtz.typepad.com

Tuesday 26 July 2011

Art Stamps Edinburgh

Early last month I went to the Art Stamps Show at the Corn Exchange in Edinburgh and had a lovely time wandering around dreaming about all the craft goodies I could buy and an even better time actually buying myself more stash!
While I was there I took part in a make and take, and had a fab time putting together this canvas using the gorgeous products of my all time crafting crush T!m Holtz!

I particularly love the dress form die and just know that I will use that a lot in my crafting. I was very happy with how this turned out and I plan to try this style of crafting more in the future.

Monday 25 July 2011

Playing with the Melt Pot

A few weeks ago I demo'ed the Suze Weinberg Melt Pot at a local craft store and for the demo I made a number of projects. This was one of them and I liked how it was quite simple with clean lines and yet at the same time it has a vintage chic look.

With this card I poured melted coloured UTEE onto a craft mat and stamped into it and also "enamelled" a paper flower by dipping it into melted clear UTEE.

I then covered a card blank with a piece of patterned scrapbooking paper, added a ribbon and Tim Holtz stamp and adhered the two finished pieces of UTEE to the card.

I like it, hope you do too.

Dangly Things!

This week I thought I would take part in the Happy Daze Design Team monthly challenge http://www.happydazedesignteam.blogspot.com/ which is aptly titled "Dangley Things" which now makes my blog title make a bit more sense! I created this kilt pin quite a while ago but was never quite that happy with it. So when I saw this challenge I dragged it out of the drawer and had another look at it to see if I could improve it. So after a bit of playing around and trying different ideas I came up with this revised pin. It has the same elements as it's initial design but I have added a fairy charm, some ideology chain and pearls and used inka Gold and black acrylic paint to age the moon and Perfect Pearls mist to added a little bit of sparkle. I am much happier with it now and hope you like it too.

Wednesday 20 July 2011

How Time Flies!

Oh my goodness! I can't believe how long it is since I last put an entry into my blog! I have been such a remiss blogger and will have to try hard to remedy this flaw! lol! Even this entry is tardy in it's apperance as you can see it is the Fathers Day card I made for my husband this year, which we all know was last month. You'll be happy to hear though, that he did actually get it on Fathers Day I'm just slow at getting on here! lol!

I really enjoyed making this card as it is really just a collection of my playing and experimenting. I used my favourite background technique of alcohol inks in shades of brown and then used black embossing paste through a Crafters Workshop mask. Once it was dry I spritzed it with Prefect Pearls sprays and matted and layered it onto black gloss card and brown glitter card and a copper base card. I then embellished it with Ideology metal work, film strip, tickets and a stamped banner that was cut using a Tim Holtz die.

I am also submitting this entry in the weekly Simple Simon Says Stamp and Show challenge http://www.simonsaysstampandshow.blogspot.com/ , which is embossing this week. Now I know my card doesn't include the expected forms of dry or heat embossing but it is made up of embossing paste through a stencil, so just a twist on the theme. Hope everyone likes it. Wish me luck!

I'm quite happy with how it turned out and I hope my husband liked it too and had a nice fathers day even though I was off walking the Cancer Research Race for Life!

I have enjoyed composing this post and will now endeavor to keep my blog up to date. Thanks to you all who have persisted with me even though I have been so slack of late!

Monday 18 April 2011

Butterflys

Just a quick summery card I made for a friends birthday using a Create and Craft kit I got a while ago. I really like the colours and butterflys are just so right now as the weather is getting better. Long may the good weather last!

Saturday 16 April 2011

Playing with Alcohol Inks

I was looking through some cards I have made a while ago and came across these two. They brought back such great memories! I made them at a class at Art from the Heart run by Dyan Reavely on Alcohol Inks just over 2 years ago and it was such fun! It was the day after Tim Holtz had been demostrating in her studio and the first time I had ever met him or seen him work in the flesh and I was mesmerised. To then follow such a high was going to be tough but Dyan managed it without even breaking a sweat! I loved the class and fell in love with my alcohol inks, and to this day they are one of my favourite mediums to work with. I love the effects they can create and the variety of surfaces they can be used on. These are some of my favourite cards that I have ever made and when I look at them they remind me of such a wonderful couple of days of crafting and exploring what is possible when we try! Thanks Dyan!

Saturday 9 April 2011

Happy Anniversary!

Thursday was Gavin and mine 5th wedding anniversary! We had a lovely day, sushi for lunch and an afternoon at the cinema watching "The Kings' Speech", which was fab and treated ourselves to a lovely station clock for the kitchen! Thoroughly enjoyed myself! I can't believe that we have been married for 5 years! Where has the time gone? It seems like only yesterday we were organising the whole shebang and here we are 5 years on with a 4 year old daughter, house extension almost completed and a whole lot more grey hairs, wrinkles and great memories! LOL!
This is the card I made for my hubby, those amongst you that are eagle eyed will notice that it is the same image that I used for the birthday card I made my father-in-law. It is a Darkroom Door stamp and I just love it! I think it lends itself prefectly to mens cards, yet has an aged vintage type feel in it's detail and design. I used it on an alcohol ink background, layered onto copper mirri card and Graphicus 45 paper, then embellished with Ideology cogs and hinge clip, Distress Stickles and "Lost and Found" salvage stickers, for the date. Actually it was quite spooky as this sticker had the actual day we got married on it! So it was meant to be, fate or what?

Saturday 26 March 2011

Inks on Canvas

I love creating canvases! And this was one I made for a class I did using 1 stamp to create many different projects. The idea was to encourage peoples imaginations and help then look at their stamps in a whole new light, so that they get the most from them. One of my favourite techniques at the moment is using spray inks with stencils and masks. I especially like using pearlescent sprays just to give that little bit of va va voom!

In this project I used a variety of spray inks and masks to create the background and then painted the edge of the canvas with a co-ordinating colour to give it a neat finish. I then made 3 triple embossed tiles and stamped into them and layered onto co-ordinating mirri card and adhered to the canvas in a tryptych arrangment. Using a variety of sizzix dies, some of which were the Tim Holtz Alterations dies, I created the swirls and 3d roses from mirri card and old book pages. I then coloured the roses and leaves with inks and sprays and adhered to the canvas with silicone glue. To finish I added some obligitory bling (well, of course! I hear you shout! lol) and popped on 3 co-ordinating gems!

Monday 21 March 2011

Stampotique Designers Challenge

This was the third challenge I decided to take part in, in the last week. I love Stampotique stamps so the thought of taking part in one of their challenges was very appealing. The Stampotique Designers Challenge blog can be found at http://www.stampotiquedesignerschallenge.blogspot.com/ and is a great place to get inspiration and ideas. This fortnight the challenge was to make something including animals, insect or bird so I made this card.
I used a Craftworks card blank and covered it in background paper I had made using pearlescent ink sprays and then using a mask with a bronze spray to create the pattern. I die-cut the bird and cage using a Tim Holtz die and coloured the birdcage with paint and sprays and the bird with left over background paper. I edged the card with Krylon pen and used a mixture of embellishements and fibres on the cage. I found a crown I had had for a while and thought that would suit the bird.
I look forward to hearing what you think.

Sunday 20 March 2011

Birthday Wishes!

Last week was my father-in-laws' 75th birthday! So I decided to make him a special card. For this I pulled out my new set of "Prague" Darkroom Door stamps and stamped the street scence image in black Archival ink over a backround made in alcoholic inks (I said I had really got back into my Alcoholic inks hadn't I?). I layered it onto some text scrapbook paper and embellished with ideology (of course!) metal corners, ribbon and a flower which I punched from an old book and the sentiment stamp onto some scrap patterned paper. I then distressed it all and put in onto a base card.
There you go all done...........Happy birthday Grandad!

Friday 18 March 2011

Simon Says Stamp and Show

Another day another challenge! How's that....my first foray into online challenges earlier in the week and now I am hooked! This card is for the "Simon Says Stamp and Show" challenge at http://www.simonsaysstampandshow.blogspot.com/ , in which the design had to include stars.
I had just bought a pack of Dovecraft "Funky Vintage" paper in which I found the prefect background paper. I distressed it with Tim Holtz "scratchy" stamp and Coffee Archival ink. I wrapped around some twine and then added the topper using foam tape.
I made the topper by using nestabilities to die cut the shape and then stamped the design using Papersartsy and Tim Holtz stamps and Coffee Archival ink, I then sprayed it with Heirloom Gold Prefect Pearls mist. I shaded and distressed the topper with distress ink and attached it to the card. The card was embellished with Tim Holtz Ideology products.
I am really happy with the finished card, I only wish the photography had been better.

Wednesday 16 March 2011

Spring Sketch Challenge

Well, this is me taking part in my first on-line challenge! I thought it was about time that I brought myself into the 21st (had to think for a minute there!) century and venture further into this area of crafting!
The challenge this month on Gill Mc Calls' blog "Creations by Gill M" at http://www.creationsbygillm.blogspot.com/ was to produce a card in a spring theme using the supplied sketch. As always, I have to alter things just a tad! So I flipped the sketch and put the sentiment to the bottom of the dividing line rather than the top. Because of these changes I decided to omit the 2 suggested embellishments.
The stamp I used was a Tina Higgins Do-Craft Papermania "Lilac" stamp. I think it looks lovely and "spring-like" stamped in these colours. I used the technique of dripping mulitple distress re-inkers onto baby wipes to create my own customised rainbow inkpad. And I am now a convert!
Hope you like it.

Sunday 13 March 2011

Craft Stamper Postcard Swap

I have recently started taking part in the Craft Stamper monthly swaps. This is only my 2nd entry so I haven't received anything back yet, but am really excited to get my first one in the post, so as to see what everyone else created.
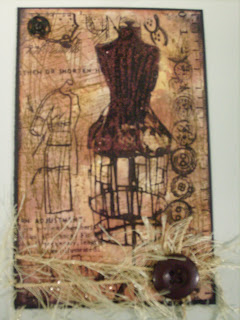
This month the theme was "Postcards" so I decided to use some of my new Tim Holtz stamps, the "Haberdashery" set and "Slight Alterations" set, as well as my new Creative Expression set, "Vintage Sewing".
I got my alcohol inks out again to create the background (boy, I am really getting into my alcohol inks! I'm really loving the effects you can get with them and wonder why I ever put them away!). Once the background was dry, which is just a few seconds, I over stamped with the Tim Holtz "scratchy" image from his Slight Alterations set. Then I created a stamped collage with various sewing images. To add dimension I added some Distress Stickles to the dress form, gold fibres, a button and a press stud. I then layered the finished postcard on black card to frame it.
For the back of the postcard I used a smaller piece of white card which I distressed with Vintage Photo Distress Ink drew a line down the middle with brown ink and then using Tim Holtz stamps again stamped the "Postcard" image and a quote that appealed to me.
I'm really starting to get into these swaps and hope that the recipient enjoys what I have created. I am looking forward to seeing how other people interpret the themes and what they make.