Thank You for Following My Blog

Monday, 25 March 2013

Dina Wakely's Workshop


Last Friday I spent the day at Art from the Heart's studio taking part in Dina Wakely's workshop.  Which was about using paints, inks, wax and modelling paste on diferent surfaces such as plaster, cardboard, and plywood.  I had a great day and had so much messy fun!
Over the day we made 9 different peices (I forgot to put one in the photo...oops) due to the cool temperatures we had trouble getting the modelling paste on two of them to dry so we only finished 7 pieces. But that's an achievement in itself I think.
All the pieces were ply wood coated with plaster which we painted in different ways and then scratched and covered in wax to then scrap again to try and achieve different layers.  On one we added plaster bandage and when that was dry we painted and waxed it.  Another was two pieces of thick cardboard which we covered in plaster bandage and then once dry painted and waxed, which are to be turned into book covers.  One of my favorites was a board that we used modelling paste through a stencil then painted, scratched and waxed. However my all time favourite of the day was the board that we painted, then adhere stamped images on tissue paper with matt medium, then waxed and added more tissue images to build up layers.
It was such a great day and I can't wait to try these techniques all again soon.

Friday, 22 March 2013

And Party......

Here is another sample that I made using the balloon stamp HB101HF from Crafty Stamps Celebration range which can found at www.craftystamps.com.  Of all the stamps I made samples with this is the one I found the most versatile and the one I made the most samples with, which I'll share with you over the next few weeks.
This was such fun to make and so quick and easy.  I bought a pre-painted wooden shape, which in this case was the "&" symbol.  I then stamped the balloon stamp randomly over the shape with Jet Back Archival ink, then use a permanent black marker to doodle along the lines of the balloon strings to give extra definition and interest .  I then coloured the stamped images with Promarkers in colours of your choice, put Glossy Accents on the balloons and Stickles glitter glue for the highlights.  Once that has all dried I used a Promarker in a complimentary colour to colour the edges of the wooden shape.  Just keep in mind that it might take more than one coat of colour to cover it properly. Then using cut'n'dry foam to shade the edges of the shape to give shape and definition. 
Now once it has all dried that is you done!


Monday, 18 March 2013

Domestic Goddess - D.I.Y.

 Recently, I was asked to make some samples for Crafty Stamps http://www.craftystamps.com  to promote their new ranges of stamps that were released just in time for Stitches Trade Show at the NEC in Brimingham. I felt really honored to be asked to make samples for such a big event and really enjoyed using these stamps which are made of deeply etched red rubber and are high quality.
The stamp I used for for these cards cam from the "Domestic Goddess" range and is titled "DIY".
I thought she was really cute and I loved playing with this image.  I had so many different ideas but only had time to make two of them.
The top card was made on and 8"x8" scalloped card blank.  The image was stamped with Faded Jeans Distress Ink and the coloured using a waterbrush with the stamped image to shade it.  It was matted onto dark blue pearlescent card and layered onto white card, that had been coloured with Distress Stain splats which had been "dribbled down the page to intimate paint splashes and spills, which was then matted onto the same dark blue card as the stamped image.  The card was then embellished with screw brads and DIY themed embellishments.
The next card was made with a cream 6"x6" card blank. A piece of distressed and inked patterned paper.  The image was stamped in Vintage Photo Distress Ink and coloured with as before.  It was die cut with decadron Spellbinder die and layered with pearlescent brown card. The topper was layered with dimensional glue to the card centrally. It was then embellished with DIY themed stickers and adhesive paper ruler ribbon.
I hope you like these cards and if you are interested in buying the stamps they are available at Stampers Grove http://www.stampersgrove.co.uk  or the Crafty Stamps website http://www.craftystamps.com


Friday, 15 March 2013

Save the Date

As many of you now know I teach classes at a local craft shop in Edinburgh called Stampers Grove (you can have a look at their blog at the following address http://www.stampersgrove.co.uk/blog/) and this is a project I made for one of my recent classes.
It is a 2013 Diary with sections for notes, addresses and of course, as the name suggests a date book. It was made completely from scratch using, chipboard, pearlescent card stock, white card, patterned paper, stamps and embellishements. It was then bound using the Bind-it-all machine.
The covers were made by covering 2 peices of A5 chipboard with Bobunny patterned paper with was attached using Rangers Glue'n'seal.
The front was decorated with stamped swirls that were heat embossed with gold embossing powder.  Die-cut shapes made with Spellbinder dies were than layered in completementary card and the year in numbers adhered with dimensional glue.
It was decorated with paper flowers and leaves, cut out stamped and heat embossed images, butterflies, ribbon and pearls.  
 The divider pages were cut just slighlty smaller than the covers. they were edged with faux stitching and a strip of the same paper used on the covers. A spellbinders die was used to cut the plaque which was then stamped with the section title.  The same swirl stamp used on the cover as was used in the rest of the project, in order to tie it all together.
 I used a Dimesion Forth Stamp set to make the calender pages and then embellished these pages with the same Creative Expressions swirl stamp and a die cut using spellbinders dies with the appropriate month stamped on the plaque.
 I also included a section for notes in order to make this a multipurpose organiser rather than just a diary.
 The "note" pages were created from blank white cardstock with cobalt archival ink and stamps.  I used a lovely Stampin'Up alphabet set, the same swirl stamp that I have used throughout the project, as well as a Prima quote and Kanban set that I used the chain for a chandelier to create the lines.
 These two pages were created in the same way as previously explained. The entire book was then bound together using the Bind-it-all machine, which in itself was a learning expereience as I had never used it before.  But the directions included with the machine are very clear and I was happy with the final result.
 I hope you like it and are tempted to try making your own.

Monday, 11 March 2013

Remember......

 
  As some of you may know or may not know I teach craft classes at a small craft shop in Edinburgh. Since about half way through last year we have been running a series of classes focusing on "Re-use, Reduce, Recycle" and in this class we altered an old box that Emma had received some cardstock in to make this decorated  memo board.
I painted a pale base colour onto the box with acrylic paint to prime it.  Covered the edges with Tim Holtz tissue tape and inked it. I lined the inside of the box with Bo Bunny patterned paper that I inked and stamped with two-step Caludine Hellmuth stamps, jet black Archival Ink and gold Paper Arsty Fresco Finish paint. 
I cut two matts of co-ordianting colours and adhered them to the box and added a pad of post-it-notes to the matts.  The word was made of alpha chippies that I coloured with Tim Holtz alcohol inks and glued to the top of the matts at jaunty angles.
 I used the reverse side of the same paatterned paper to make the paper roses and punched some leaves.  Added some Ideology hitch fasteners for keyrings to hang on. 
 I then die cut and decorated a dress form mannequin, and some cotton reels.  I then added these to the edges of the box and embellished with buttons, ribbons, hat pins and adhesive gems.
It was such fun making this and we had a such a great time in the class too. 


Saturday, 9 March 2013

My Beautiful Princess


My gorgeous daughter turned 6 in January and this is the card I made her to celebrate.  She is currently right into her Disney Princesses among other things and at the time wore this tiara she got for Christmas almost constantly.  So it seemed only right that I use some of my princess themed scrapbooking stash to make this card, with a picture of my princess taking center stage!
I then used an inked doily, adhesive pearl swirls, some purple gems and a large glittery number "6" to embellish the card.
She was so excited about turning 6 and loved her princess card.

Friday, 8 March 2013

103!!

 
Recently, I had the amazing pleasure and privilege of being asked to make a colleague's at works grandfather a 103rd birthday card. I was soc huffed to be asked to make such a special card, and it was even more special as I made his 100th birthday card!  The only 100th and 103rd birthday cards I have ever made!
So, to make this card I used number templates and cut them out of Tim Holtz patterned paper.  I then adhered them to an A5 pearl bronze card blank.  I edged the numbers and card blank with gold peel offs and them very simply embellished the card with  ribbon, an adhesive black gem swirls, an Ideology inspirational plaque that was coloured with metallic Distress Stains, and vintage metal chasms, chain and brad.
The recipient has poor eyesight so I made everything large and bold so hopefully he could see it and enjoy it.
I wish him every happiness on this such a special birthday, and hope he likes his card!.


Monday, 4 March 2013

My Heart Belongs to...................

 
Recently, I decided that I have way to much stash and that I have ti definitely start using it rather than just gazing longingly at it and sometimes stroking it.....lol!
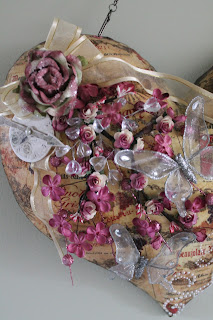
So, after I a little thought I picked a large papier mache heart to decorate with bit and pieces from my large amount of stash.  So I started by painting the heart with a cream acrylic paint and then covering with a printed napkin and matt glue'n'seal.  I then distressed the edges with Aged Mahogany, Vintage Photo and Walnut Stain Distress Ink.
Once that was all dry, I dove into my glorious stash and started pulling out anything that took my fancy.  It was then a matter of trying different things until I was happy with the look I managed to create.
So, I used a lot of paper flowers,along with crystal sprays and glitter ball sprays and layered them onto the heart and glued in place with glue gel.  Once the flowers were in place I embellished with butterflies, a clock and ribbon.
I also used an Ideology inspirational plaque and the word "Dream" that I found in my stash. More butterflies, an adhesive pearl swirl, some metal embellishments and a word plaque.
So I could hang it, I used a crop-a-dile and punched two holes and set co-ordinating eyelets and then used two swivel clasps, jump rings and some chain.
It was so much fun creating this and playing with my stash.  Sometimes it is so easy to just save your stash but in fact it is more fun to use it.  I'm off to use some more.....!


Friday, 1 March 2013

Happy Valentines Day (or at least it was.........lol!)

 
So, just in case anyone missed it........it was Valentine's day two weeks ago! And believe it or not, I managed to remember to make my lovely hubby a card and in time for the actual event! lol!  This year we had a very quiet day as we had the children at home and that doesn't lend itself much, to a romantic nigh,t but we had a lovely time.
  This card was made using a topper I had made earlier with a Stampin'Up set stamped on Stampin'Up on cream cardstock and newsprint patterned paper using black and real red ink.  It was matted onto black card and then layered onto a Dawn Bibby shaped card with dimensional glue gel and embellished with adhesive black gem swirls and adhesive black heart shaped gems.
I really enjoyed making this card andf it was so quick and simple to make.  I like it the images and feel so much I'll have to make some more of them.