
As many of you now know I teach classes at a local craft shop in Edinburgh called Stampers Grove (you can have a look at their blog at the following address http://www.stampersgrove.co.uk/blog/) and this is a project I made for one of my recent classes.
It is a 2013 Diary with sections for notes, addresses and of course, as the name suggests a date book. It was made completely from scratch using, chipboard, pearlescent card stock, white card, patterned paper, stamps and embellishements. It was then bound using the Bind-it-all machine.
The covers were made by covering 2 peices of A5 chipboard with Bobunny patterned paper with was attached using Rangers Glue'n'seal.
The front was decorated with stamped swirls that were heat embossed with gold embossing powder. Die-cut shapes made with Spellbinder dies were than layered in completementary card and the year in numbers adhered with dimensional glue.
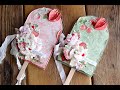
It was decorated with paper flowers and leaves, cut out stamped and heat embossed images, butterflies, ribbon and pearls.

The divider pages were cut just slighlty smaller than the covers. they were edged with faux stitching and a strip of the same paper used on the covers. A spellbinders die was used to cut the plaque which was then stamped with the section title. The same swirl stamp used on the cover as was used in the rest of the project, in order to tie it all together.

I used a Dimesion Forth Stamp set to make the calender pages and then embellished these pages with the same Creative Expressions swirl stamp and a die cut using spellbinders dies with the appropriate month stamped on the plaque.

I also included a section for notes in order to make this a multipurpose organiser rather than just a diary.

The "note" pages were created from blank white cardstock with cobalt archival ink and stamps. I used a lovely Stampin'Up alphabet set, the same swirl stamp that I have used throughout the project, as well as a Prima quote and Kanban set that I used the chain for a chandelier to create the lines.

These two pages were created in the same way as previously explained. The entire book was then bound together using the Bind-it-all machine, which in itself was a learning expereience as I had never used it before. But the directions included with the machine are very clear and I was happy with the final result.

I hope you like it and are tempted to try making your own.


No comments:
Post a Comment